Building a Common Navigator based viewer, Part I: Defining the Viewer
I've started fielding questions about the Common Navigator on the eclipse.platform newsgroup and the message from the community is resoundingly that there are not enough examples. In order to help the community adopt the Common Navigator framework, I'm going to be fleshing out some examples (in the Eclipse repo at dev.eclipse.org:/home/eclipse, where you can login as "anonymous"; see the wiki for more information. I will be documenting these examples here in this blog. Eventually I will intgrate the documentation that evolves here back into the Platform SDK, but I want a forum where potential consumers can provide feedback easily and directly to the distribution media (e.g. this blog).
Specific documentation on the extension points and API is available in the Eclipse Platform Help (Help > Help Content) under the Platform Plug-in Developer's Guide > Reference > API Reference | Extension Points Reference. The relevant extension points are org.eclipse.ui.navigator.viewer and org.eclipse.ui.navigator.navigatorContent. The relevant API packages are org.eclipse.ui.navigator. If you'd like more details on the specifics mentioned in this post, please follow up with these references.
So where to begin? First we're going to configure our plugin that will contain the viewer to add org.eclipse.ui.navigator to its dependencies. Then we're going to define a view part using the org.eclipse.ui.views extension point and specify the org.eclipse.ui.navigator.CommonNavigator class as our view part implementation, which will provide a cradle for our viewer. Then we will define a org.eclipse.ui.navigator.viewer extension to configure the viewer as a Common Navigator. Finally, we can define org.eclipse.ui.navigator.navigatorContent extensions along with bindings (org.eclipse.ui.navigator.viewer/viewerContentBinding) to associate extensions with our viewer.
You don't have to use org.eclipse.ui.navigator.CommonNavigator in order to take advantage of the framework; you could embed content using the org.eclipse.ui.navigator.INavigatorContentService virtually anywhere from dialogs to editors or define your own viewer and view part class, but for this example, we're going to stick to the basics.
Basic Setup
The Common Navigator Framework is a feature that is new to Eclipse 3.2. Therefore, you must have an update to Eclipse 3.2 environment installed. The topic of this post will not get into setting up Eclipse for self-hosting development. I assume that you have Eclipse 3.2 setup and are either self-hosting against a target of your own choice or the default.
Before we do anything, we need to make sure that we have our plugin configured with the necessary dependencies. Either create a new Plugin (File> New> Project: Plug-in Development> Plug-in Project: Set the name and accept the defaults), or open up the Plug-in Manfiest Editor (select the "plugin.xml" file in your viewer of choice (Project Explorer, Package Explorer, Navigator, etc) and double-click or right-click and select Open With> Plug-in Manifest Editor. On the Dependencies tab, click Add... and begin typing org.eclipse.ui.navigator and select it when it is highlighted or when you see it in the list.
Now select the Extensions tab of the editor.
Defining the view part
When defining a Common Navigator enabled viewer, you must declare the actual view part. Eclipse view parts are defined by the org.eclipse.ui.views extension point. A view part is the container for our viewer; it has a tab handle with a label, a place for a view menu (the little triangle in the top right corner of the view part), and can contain any widget that we need to display to the end user. View parts are not specific to Common Navigators, we just need a cradle to hold our viewer.
You can define the view through the Extensions tab by selecting Add... and begin typing org.eclipse.ui.views until you see it in the list. Then right-click on the entry that is created under the "All Extensions" tree named org.eclipse.ui.views and choose New > view. This will create the
When you select the view element, the available attributes for the element should appear as editable textboxes and widgets on the right. We are going to enter the following values (without the quotes):
id: "org.eclipse.ui.examples.navigator.view"
name: "Example View"
class: "org.eclipse.ui.navigator.CommonNavigator"
icon: "icons/filenav_nav.gif" (or your own)
allowMultiple: false
Now select the "plugin.xml" tab of the editor. You should see something like the following. You can choose to create a category as in the diagram, but be sure to indicate which category your viewer should be associated with by specifying the "category" attribute of the viewer. Otherwise, your viewer will appear in the Other category of the Show View dialog (Window > Show View > Other...).

Defining the viewer configuration
Once we define the view part, we need to define a configuration extension for our view part (org.eclipse.ui.navigator.viewer) which will tell the framework some basic things like which view part is a Common Navigator, what the structure of the popup menu should be, and whether to respect object contributions, in addition to properties that influence the default behavior of the viewer.
Open the Extensions tab again on the editor and click Add...; when the dialog appears begin typing org.eclipse.ui.navigator.viewer until you see it in the list and then select it. Right-click on the new org.eclipse.ui.navigator.viewer element in the "All Extensions" tree and choose New > viewer. The
Some comments on popup menus. The Common Navigator framework has two means to allow viewers to customize their menus. The first way to configure the popup menu is to specify the popupMenuId of viewer to accept the default separators and group marker ids for the menu. The default values are documented under the org.eclipse.ui.navigator.viewer extension point, but are reproduced below for convenience. Alternatively, you could choose not to specify a popupMenuId and instead specify a <popupmenu /> element as a child of the <viewer /> element. Here, you may define your own separator and group markers for your downstream clients to add to. If you expect to bind the content or actions of the content extensions provided by the Platform (Resource, Java(tm)), then it is recommended that you use the default groupings.
"group.new" separator="true"
"group.goto"
"group.open" separator="true"
"group.openWith"
"group.edit" separator="true"
"group.show" separator="true"
"group.reorganize"
"group.port"
"group.generate" separator="true"
"group.search" separator="true"
"group.build" separator="true"
"additions" separator="true"
"group.properties" separator="true"
Some comments on options. The < options /> element under the <viewer /> element allows you to specify String-based name=value pairs. There are a few options used by the base framework (documented in the Examples section of org.eclipse.ui.navigator.viewer), but the mechanism can be used by your own viewers or extensions to provide extra configuration to extensions bound to the viewer. See org.eclipse.ui.navigator.INavigatorViewerDescriptor for the API to read the properties specified in a <viewer />element. You can get to the viewer descriptor via the org.eclipse.ui.navigator.INavigatorContentService of a Common Navigator viewer.
Once you have set the viewerId, you can select the "plugin.xml" tab to see the following element defined.

After defining the viewer, we will need to add content extensions and bind them to the viewer. I'll cover this in more detail in the next post. For the example we'll simply bind the default resource content (defined by the org.eclipse.ui.navigator.resources plugin) to our viewer.
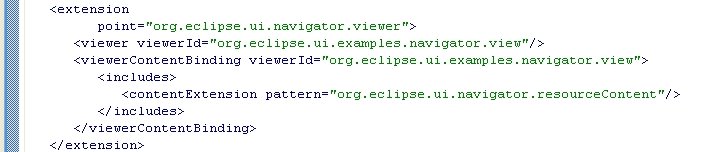
Go back to the Extensions tab, right-click on the org.eclipse.ui.navigator.viewer extension and choose New > viewerContentBinding. Select the viewerContentBinding element and set the viewerId to the id we are using for our example viewer ("org.eclipse.ui.navigator.examples.view").
Right-click on the new viewerContentBinding element, and choose New > includes. Finally, right-click on the new includes element
and choose New > contentExtension. For the pattern attribute of the contentExtension we will specify "org.eclipse.ui.navigator.resourceContent" without the quotes, which is the identifier used by the org.eclipse.ui.navigator.resources plugin to identify the Resource extension.
On the "plugin.xml" tab, we should have something like the following:
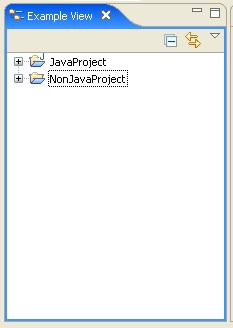
You may now launch the workbench (Run... > New Eclipse Application) to see the viewer in action. We haven't bound any actions to it yet, so you'll need to use either the Resource Navigator or the Package Explorer to create projects that you can see in the viewer. We'll add Resource actions and filters next, but for now, take notice of the default behavior associated with the viewer. The Collapse All button, the Link with Editor button, the Filters button (along with a Filters ("Available Filters") tab and an Extensions ("Available Content") tab.
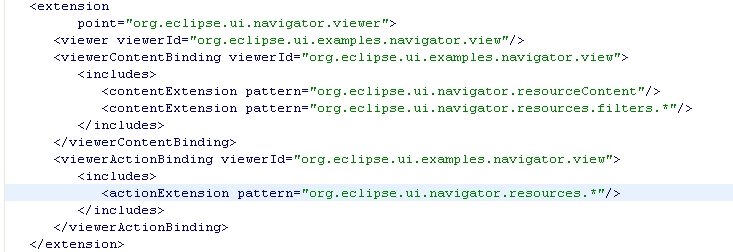
To bind the resource filters, we need to add another contentExtension element to our includes. Specify "org.eclipse.ui.navigator.resources.filters.*" as the identifier. This will pick up all resource filters defined by org.eclipse.ui.navigator.resources. Alternatively, you could select the individual filters you want by look at the plugin.xml file of that plugin and picking out the identifiers.

Select Run... again and verify that you now have several resource filters in your "Available Filters" tab of the Filters dialog.
Next we'll bind the default resource actions. To bind actions, we need to add a viewerActionBinding to the root of our extension point. Right-clikck org.eclipse.ui.navigator.viewer and select New > viewerActionBinding. Make sure the viewerId is the correct, and then add an includes element that has a actionExtension element. For the pattern attribute, specify "org.eclipse.ui.navigator.resources.*". Now when you Run... the workbench, you'll see New, Import, Export, and Refresh by default in the empty viewer, and other actions approximating the Resource Navigator when you select elements in the viewer.
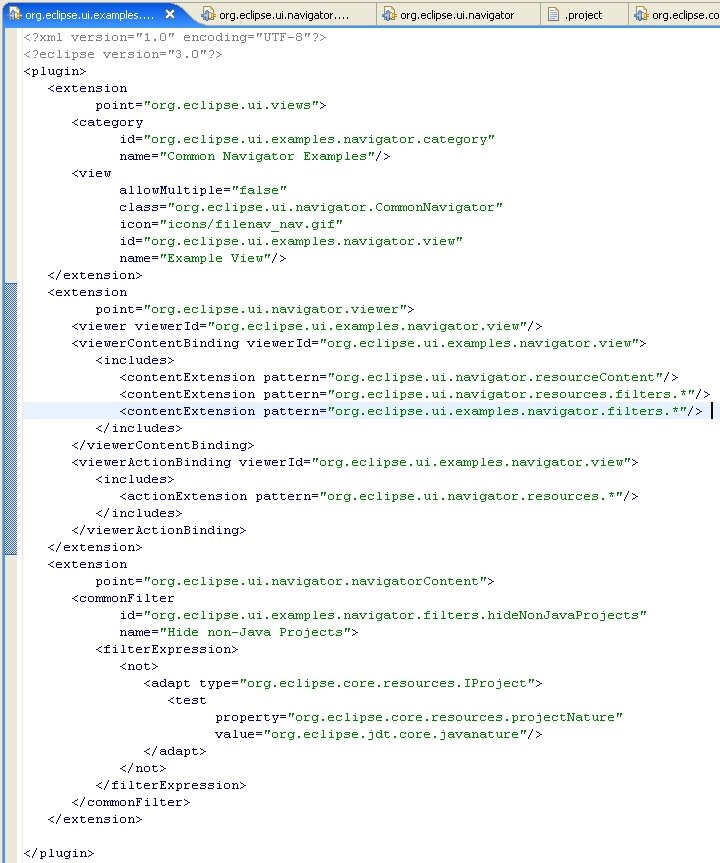
Your plugin.xml at this point should look like:
"How does he know all the right ids? This is a little too "magic number for me!" To locate the identifiers of content extensions you would like to bind to your viewer, you can peruse the plugin.xml files of plugins that define the extensions. You can use the Plug-ins view to make this easier (Window > Show View > Other...: PDE > Plug-ins) or you can open the plugin.xml file of org.eclipse.ui.navigator.navigatorContent (using the Plug-ins view, even) and on the Extension Points tab, select navigatorContent. Then click Find References to locate all extensions in your workspace that define content or action extensions you might want to use in your own viewer. Content extensions are defined by the navigatorContent element, so use the id attribute of navigatorContent extensions you would like to bind when you define contentExtension elements under viewerContentBindings for your viewer. Action extensions are defined by the actionProvider element, so use the id attribute of the actionProvider extensions you would lik to bind when you define actionExtension elements under viewerActionBindings for your viewer. Keep in mind that actionProvider that are nested under navigatorContent extensions are automatically bound when their enclosing content extension is bound to a viewer.
Defining Filters
The last thing we are going to do today is define a filter for our viewer using Eclipse Core Expressions. Documentation on the Core Expressions framework is available with the org.eclipse.core.expressions plugin. We are going to use the property testers defined by org.eclipse.core.resources to test for a specific project nature, and hide all projects which do not have this project nature.
So back on the Extensions tab of the Plug-in Manifest Editor, select Add... and choose org.eclipse.ui.navigator.navigatorContent. Then add a new commonFilter element to this extension (same as before: right-click on the org.eclipse.ui.navigator.navigatorContent element, choose New > commonFilter). Change the suggested id to "org.eclipse.ui.examples.navigator.filters.hideNonJavaProjects", and change the name to "Hide non-Java projects". Instead of specifying a class implementation, we are just going to define the expression in terms of XML. Right-click on the commonFilter element and select New > filterExpression. From here, we can continue using the right click menu to create an expression like the following:
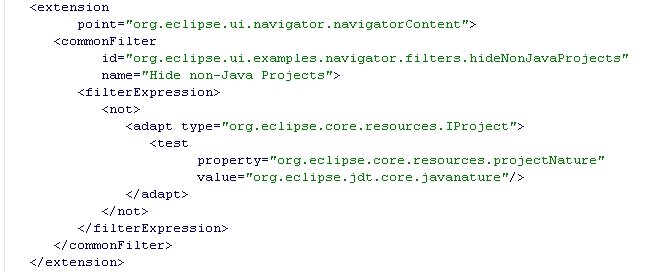
You can also set the activeByDefault attribute in the extension to determine whether the filter is active in the default configuration.
Finally, we need to define a contentExtension as part of our viewerContentBinding for this viewer. Be sure to use the id of our new filter, or a generic pattern (like "org.eclipse.ui.examples.navigator.filters.*") to bind this filter and all future filters that we (or our downstream contributions) define that match this id. Your final plugin.xml should look like the following:
Now Run... the workbench one last time. Create a few Simple projects and a few Java Projects. When the "Hide non-Java Projects" filter is enabled, the Simple projects should disappear from the view.
posted by Michael D. Elder at 2:41 PM
![]()
![]()

<< Home